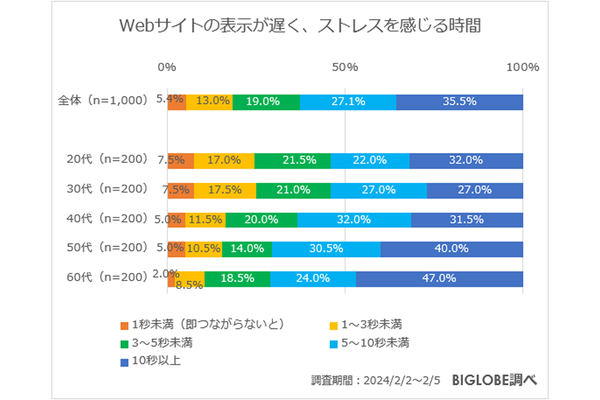
WordPressプラグインの作り方を学ぶ前回の記事からの続きです。コーポーレートサイト向けに、企業の拠点情報を表示するプラグインを作っています。
拠点情報のショートコード
ここで、メインクラスと組み合わせて使用するショートコードのクラスを説明します。
ショートコードを追加することで、管理者はインターフェイスを使って簡単にさまざまな拠点情報を紹介できます。管理者が具体的な拠点をIDで指定するか、すべての拠点を指定して出力するか、といったカスタマイズができます。ページ上でこのショートコードを使用するときは、以下のように表示されるはずです。

wp_location_shortcode.phpファイル内で作業しています。
ダイレクトアクセスを拒否する
メインのPHPファイルと同様に、ダイレクトアクセスは拒否するのが望ましいです。ファイルの先頭に以下を追加してください。
defined( 'ABSPATH' ) or die( 'Nope, not accessing this' );
wp_location_shortcodeクラス
ショートコードクラスのアウトラインの作成から始めます。このクラスはメインクラスほど大きくはないですが、関数が含まれています。
//defines the functionality for the location shortcode
class wp_location_shortcode{

}
_construct(コンストラクタ)関数
コンストラクタ関数を定義し、アクションとフィルターを追加します。このクラスは1つだけ関数を必要とします。
//on initialize
public function __construct(){
    add_action('init', array($this,'register_location_shortcodes')); //shortcodes
}
拠点のショートコードを登録する
register_location_shortcodes関数はショートコードを追加するのに使います。
add_shortcode関数を呼び出して、wp_locationsという新しいショートコードを作成します。次にlocation_shortcode_output関数を使って、ショートコードを出力します。
//location shortcode
public function register_location_shortcodes(){
    add_shortcode('wp_locations', array($this,'location_shortcode_output'));
}
ショートコードを出力する
location_shortcode_output関数はadd_shortcode関数から呼び出され、ショートコードの出力に使用されます。
//shortcode display
public function location_shortcode_output($atts, $content = '', $tag){

    //get the global wp_simple_locations class
    global $wp_simple_locations;

    //build default arguments
    $arguments = shortcode_atts(array(
        'location_id' => '',
        'number_of_locations' => -1)
    ,$atts,$tag);

    //uses the main output function of the location class
    $html = $wp_simple_locations->get_locations_output($arguments);

    return $html;
}
location_shortcode_output関数の役割を説明します。
- ショートコード$attsの引数を、ショートコード$contentの間のコンテンツ、ショートコード名$tagを取ります。これらの要素が出力を補助します
- メインの拠点クラス(とその関数すべて)にアクセスするのでグローバル変数$wp_simple_locationsを参照します
- shortcode_atts()関数を使って、ショートコードの引数のデフォルト配列を作成します
- $wp_simple_locationsオブジェクトからget_locations_output関数を使い、ショートコードを出力します。ショートコードは動的コンテンツを提供できるので引数に渡します。たとえば、ある拠点IDを渡すと1つの拠点だけが返されます
- ショートコードを返し、それを追加したページや投稿に表示されます
新しいオブジェクトwp_location_shortcodeを作成する
クラスの最後に、新しいオブジェクトwp_location_shortcodeを作成します。これでクラス内のすべての機能を有効にし、新しいショートコードを使えるようになります。
$wp_location_shortcode = new wp_location_shortcode;
拠点ウィジェット
拠点ウィジェットの機能を扱うクラスを説明しながらまとめます。
ほとんどすべてのテーマがウィジェットをサポートしているので、ウィジェットのサポートを追加します。ウィジェットを使うと、管理ユーザーは簡単かつスピーディーな方法で複数の拠点(または1つの拠点)を紹介できます。
wp_location_widget.phpファイルを開いて始めます。
ダイレクトアクセスを拒否する
ここでも、最初に次のコードを記述して、PHPファイルへのダイレクトアクセスを拒否します。
defined( 'ABSPATH' ) or die( 'Nope, not accessing this' );
wp_location_widgetクラス
wp_location_widgetクラスの基本構成を作ります。
クラスはこれまで作成したほかのクラスに似ていますが、ここではすでに定義したWP_widgetクラスを拡張しています。
//main widget used for displaying locations
class wp_location_widget extends WP_widget{

}
__construct(コンストラクタ)関数
__construct関数の内部で、親クラスの__construct関数をオーバロードし、その値を与えることで、ウィジェットの基本プロパティを定義します。ウィジェットのID、ウィジェット名と説明を設定します。
さらに、register_wp_location_widgets関数をwidgets_initフックの上へフックし、ウィジェットを登録できるようにします。
//initialise widget values
public function __construct(){
    //set base values for the widget (override parent)
    parent::__construct(
        'wp_location_widget',
        'WP Location Widget',
        array('description' => 'A widget that displays your locations')
    );
    add_action('widgets_init',array($this,'register_wp_location_widgets'));
}
ウィジェット用の管理者インターフェイスを構築する
管理者インターフェイスは、管理ユーザーがウィジェットを設定するときに使います。
複数の拠点から選んでほしい場合にはウィジェット経由で表示する拠点の数を選べますし、もちろん1つの拠点だけの表示もできます。
form()関数は親クラスのWP_widgetから受け継がれており、ウィジェットの管理画面で自動的に呼び出されます。
    //handles the back-end admin of the widget
    //$instance - saved values for the form
    public function form($instance){
        //collect variables
        $location_id = (isset($instance['location_id']) ? $instance['location_id'] : 'default');
        $number_of_locations = (isset($instance['number_of_locations']) ? $instance['number_of_locations'] : 5);

        ?>
        <p>Select your options below</p>
        <p>
            <label for="<?php echo $this->get_field_name('location_id'); ?>">Location to display</label>
            <select class="widefat" name="<?php echo $this->get_field_name('location_id'); ?>" id="<?php echo $this->get_field_id('location_id'); ?>" value="<?php echo $location_id; ?>">
                <option value="default">All Locations</option>
                <?php
                $args = array(
                    'posts_per_page'    => -1,
                    'post_type'         => 'wp_locations'
                );
                $locations = get_posts($args);
                if($locations){
                    foreach($locations as $location){
                        if($location->ID == $location_id){
                            echo '<option selected value="' . $location->ID . '">' . get_the_title($location->ID) . '</option>';
                        }else{
                            echo '<option value="' . $location->ID . '">' . get_the_title($location->ID) . '</option>';
                        }
                    }
                }
                ?>
            </select>
        </p>
        <p>
            <small>If you want to display multiple locations select how many below</small><br/>
            <label for="<?php echo $this->get_field_id('number_of_locations'); ?>">Number of Locations</label>
            <select class="widefat" name="<?php echo $this->get_field_name('number_of_locations'); ?>" id="<?php echo $this->get_field_id('number_of_locations'); ?>" value="<?php echo $number_of_locations; ?>">
                <option value="default" <?php if($number_of_locations == 'default'){ echo 'selected';}?>>All Locations</option>
                <option value="1" <?php if($number_of_locations == '1'){ echo 'selected';}?>>1</option>
                <option value="2" <?php if($number_of_locations == '2'){ echo 'selected';}?>>2</option>
                <option value="3" <?php if($number_of_locations == '3'){ echo 'selected';}?>>3</option>
                <option value="4" <?php if($number_of_locations == '4'){ echo 'selected';}?>>4</option>
                <option value="5" <?php if($number_of_locations == '5'){ echo 'selected';}?>>5</option>
                <option value="10" <?php if($number_of_locations == '10'){ echo 'selected';}?>>10</option>
            </select>
        </p>
        <?php
    }
form()関数の動きを説明します。
- 最初に、拠点IDと拠点数の値を定義しています。(もしすでに値が入っている場合は)$instance変数がこれらの値をホールドしているか確認します。もし値がある場合はその値を抽出し、ない場合は、デフォルト値を入れます(拠点数は5、拠点IDはデフォルトに設定)
- ラベルとフォームフィールドを作成し、管理者に拠点を表示します。get_posts()ですべての拠点をフェッチして表示します。拠点IDに保存された値(設定されている場合)と合っているか、拠点ごとに確認します
- 表示する拠点数の選択リストを作成します。再度、拠点数の変数に渡された値が合っているか拠点ごとに確認します
ウィジェットの更新とオプションの保存
ウィジェットは更新機能を呼び出して、フォームの値を保存する必要があります。update()関数で更新します。
update()関数は再度、親クラスのWP_widgetから受け継がれるので、値の保存方法を指定するだけです。
//handles updating the widget
//$new_instance - new values, $old_instance - old saved values
public function update($new_instance, $old_instance){

    $instance = array();

    $instance['location_id'] = $new_instance['location_id'];
    $instance['number_of_locations'] = $new_instance['number_of_locations'];

    return $instance;
}
$new_instanceと$old_instanceの2つの変数が与えられます。
新しいインスタンスはフォームの現在値をもち、古いインスタンスは前の値をもっています。
ここでやるべきことは、新しい配列を作成し、抽出した値をホールドし返すことです。
フロントエンドでウィジェットを表示する
widget()関数は親クラスのWP_widgetから受け継がれる別の関数で、フロントエンドのウィジェットの出力を担っています。wp_simple_locationsクラスからディスプレイ関数を活用して出力します。
//handles public display of the widget
//$args - arguments set by the widget area, $instance - saved values
public function widget( $args, $instance ) {

    //get wp_simple_location class (as it builds out output)
    global $wp_simple_locations;

    //pass any arguments if we have any from the widget
    $arguments = array();
    //if we specify a location

    //if we specify a single location
    if($instance['location_id'] != 'default'){
        $arguments['location_id'] = $instance['location_id'];
    }
    //if we specify a number of locations
    if($instance['number_of_locations'] != 'default'){
        $arguments['number_of_locations'] = $instance['number_of_locations'];
    }

    //get the output
    $html = '';

    $html .= $args['before_widget'];
    $html .= $args['before_title'];
    $html .= 'Locations';
    $html .= $args['after_title'];
    //uses the main output function of the location class
    $html .= $wp_simple_locations->get_locations_output($arguments);
    $html .= $args['after_widget'];

    echo $html;
}
widget()関数の動きを説明します。
- 表示機能を使いたいので、グローバルオブジェクト$wp_simple_locationsを収集します
- 引数が空の配列を作成し、ウィジェットが引数を指定したか確認します(表示する拠点数か1つの拠点を指定など)
- 出力のためのビルド過程を開始し、$html変数を定義します。$wp_simple_locationsオブジェクトで定義されたget_locations_output()関数を呼び出し、引数で渡します(必要なすべてのHTMLを返します)
- $html変数がエコーされて、ウィジェットが表示されます。
使用するウィジェットを登録する
widget()関数を使って、WordPressにウィジェットを登録します。register_widget()関数を呼び出し、値にクラス名を入れます。
//registers our widget for use
public function register_wp_location_widgets(){
    register_widget('wp_location_widget');
}
2回に分けて、はじめからWordPressプラグインを構築する実例を紹介しました。楽しんでいただけましたか? 継続して、さらに進めていただけたら幸いです。